
Table of Contents
For avid readers who want to connect with fellow bookworms, The Nook is a community hub that makes it easier to create, manage, and join a book club.
TheNook.mp4
Many of the current reading apps (such as Goodreads) are not focused on the intimate community experience that many readers are looking for. Although some apps do offer the possibility to create clubs and message users, most of them do not set a limit on the number of members, resulting in overcrowded groups, and little to no engagement between members.
The Nook provides a space for people who are passionate about reading and are either already part of an existing bookclub or want to find a group of like-minded individuals to share their interest both online and in-person.
To achieve the former, our app enables book club administrators to create a page for their existing club where members can easily vote for the next book to read, access the information about past books read in the club, and see other members' opinion about books.
The latter, on the other hand, can browse through the existing book clubs to join one, or start a new one if there is none of their interest.
This app is made up of the following views: Home - Clubs - Single Club - Club Admin - Books - Single Book - Profile - Edit Profile - Contact - Log In - Sign Up - Error Page.
Consists of The Nook's logo and mission statement, a carousel displaying of book clubs (with clickable links if the user is logged in), as well as the top 4 books based on users' ratings.
On the left side, you can browse through all existing clubs through the search function, filtering by club name, location or category, or create a new club using by filling in the form. You can also enter the page of an existing club by clicking on the More Info button at the bottom of its correspondent card.
Shows a list of the club's members, relevant information about the next meeting (if one has been scheduled), a poll to vote on the next book to read (if applicable), and a bookshelf with all the books that have been previously discussed in that club.
This view can only be accessed by logged-in users.
On the left side, the Add Meeting form will fetch a book from the Google Books API based on the book's title, and update the Next Meeting section in the single club view.
The form on the right side will create a three-option poll for club members to vote the next book to read. The poll will be visible on the club page, and the percentages for each option will update after each vote.
This view can only be accessed by club creators, and can be reached by clicking on the Club Admin button on the Single Club view.
Provides a list of all books that have been entered in the database by users or clubs, and displays the clubs in which each book is being read. You can also search for a specific book based on its title or author.
When clicking on More Info underneath a book card in the Books view, you will be redirected to a more extensive description of that book, followed by the clubs that have discussed that book, and the ratings and reviews of all users that have read that book.
This view can only be accessed by logged-in users.
It displays the user's username and password, a list of all clubs they are a member of, a shelf with the books they have marked as favorites as well as a shelf with all books they have read and given a rating to.
This view can only be accessed by logged-in users, by clicking on the Profile button on the navbar.
This page allowes users to search for a specific club or book to edit by using the respective search function.
Users can leave a club they are members of by clicking on the Leave club button on the club's card and confirming the message that will pop up on the screen.
They can also Add A New Book by filling in the form, which will result in an API fetch based on the book's name.
Finally, they can edit their rating, date, favorite status, and review for each book in their bookshelf.
This view can only be accessed by logged-in user, by clicking on the Edit button on top of the Profile View.
When clicking on the Contact button in the navbar, you will see The Nook's contact information. You can contact The Nook by filling in the form on the right; upon clicking on Send, you will receive an email on the address that you provided confirming that the message has been received correctly, including a copy of your message.
Users can log in by clicking on the Log In / Register button on the navbar, or through the Join The Nook! button on the top section of the Home page. Moreover, users will be redirected to this screen if they try to click on the More Info button when browsing through the Clubs page.
To log in, a user has to provide a correct username-password combination. Once the user is logged in, the navbar will show a button to access this user's profile and edit it, as well as a button to log out, thus terminating the session.
The Sign Up view can be from the Log In view. A new user can create an account by typing in a username, email, and password. Upon clicking on Create Account, the user will be automatically logged in and redirected to the Home page.
The Error page will appear if the user types in an inexistent URL. It contains buttons that enable the user to navigate to the Books or Clubs views, or the Home page.
- VS Code
- Github
- Gitbash
- Postman
- MySQL
- HTML
- CSS
- JavaScript
- React.js
- Bootstrap
- Node.js
- Express
- Lodash
- JWT
- Bcrypt
- EmailJS
- Google Jamboard
- Trello
- Mural
- Luxon
- DrawSQL
- Google Books API
- React-Leaf-Polls
- React Stars
- Canva
- npm
- node
- mySQL
- GoogleBooksAPI Key
- Create a .env file:
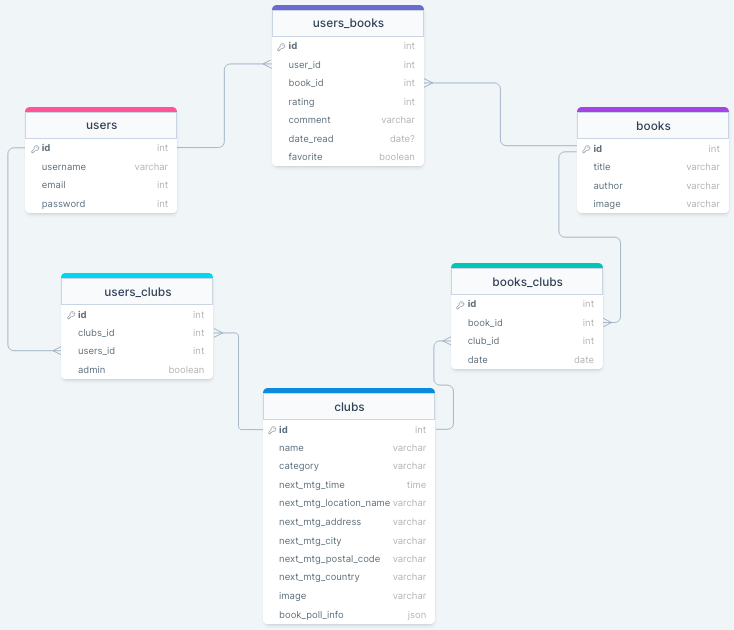
DB_HOST = localhost
DB_NAME = the_nook
DB_USER = root
DB_PASSWORD = root
GOOGLE_BOOKS_API_KEY = (Enter your key once it's been created.)
TZ = UTC
- To run the database, type 'mysql' into the terminal and run the following command:
CREATE DATABASE the_nook;- Install NPM packages on both the server and on the client.
npm install
- Make sure to populate your database with the correct info by typing this on the server side:
npm run migrate
- To run the backend, type in the server side:
npm start
- In a second terminal window, type 'cd client' to get into the front-end folder, then type:
npm start
Frontend runs on http://localhost:3000, and backend runs on http://localhost:5000.
A table explaining all API routes' design in detail can be accessed here.
Some of the features that will be implemented in the future include:
- A chat feature for each club's page;
- A calendar showing next and past meeting's of a club;
- A map to show the club's next meeting location;
- A shop for users' to buy the books for the next meeting;
- Possibility to choose a club's maximum number of users (now by default at 5 members for all clubs).
- Fork the Project
- Create your Feature Branch (
git checkout -b feature/MyFeature) - Commit your Changes (
git commit -m 'Added MyFeature') - Push to the Branch (
git push origin feature/MyFeature) - Open a Pull Request
Antonia Vladut - LinkedIn
Lauren Goldstein - LinkedIn
Tina Decman - LinkedIn
Veronica Baldin - LinkedIn
- Instructor Jim Rudolf
- TA Lucie Baborová
- TA Maria Llaverias Pugliese
- TA Pia Prozesky
This is a student project that was created at CodeOp, a full stack development bootcamp in Barcelona.