AppTestStudio is an event driven auto-clicker to visually design, test, and deploy automated mouse and keyboard actions with millisecond timing and pixel perfect accuracy.
Visualy design events and actions. You define how, when, and where to click in a no-code environment.
- Make a new project.
- Define which window to check for events.
- Visually create events to use a triggers.
- Visually Attach actions to those triggers.
- Run the script.
- Screenshots are taken at the General Loop Delay interval in ms.
- Each Event is checked against the screenshot.
- If the Event matches, child events are checked against the screenshot.
- If a Action is encoutered, mouse or keyboard actions are taken.
- When a Action or Event is completed a new screenshot is taken and it starts at the top of the script.
-
Project View shows the project structure with icons for each event type.
- Groups allow you to organize events and actions.
- Create Events based on a X,Y and Pixel color.
- Create Events based on an image.
- Attach Actions to the events that execute when the event is identified.
- Events can be Mouse Click, Mouse Move, Mouse Swipe, and Keyboard events.
- Prioritize events by placing them closer to the top.
- Object library to reuse components for maximum efficiency.
-
Group Designer
- Groups are collections of other Groups, Actions, and Events.
- Groups have no testable criteria and when checked are considered always true.
- Groups can be used to organize related Activities.
-
Event Designer
- Events always start out as a screenshot in the main area of the designer.
- Use Parent Screenshot [Checkbox] [Runtime Use Only] When checked use the existing screenshot taken from the last parent or sibling - At Runtime.
- Take a screenshot [Button] [Design Use Only] Takes a new screenshot from the current target application window.
- Take Parent screenshot [Button] [Design Use Only] Takes the existing screenshot from the parent and puts that screenshot in the design window.
- Events always start out as a screenshot in the main area of the designer.
-
Design Color/Point Events
- To create a Color/Point entry, click anywhere on the screenshot in the design view.
- Use the zoomed in [Color at Pointer] window to fine tune and visualize correct color.
- Color/Point is a list of R,G,B color values and a X,Y
- Points +/- [Dropdown] enable added range of the R,G,B color values by adding a +- range to the colors.
- Color R120, G140, B132 adds +/- that number to the RGB values: Example 5 allows R 115-125, G 135-145, B 127-137
- Logic AND
- The list of RGB values must all be true for the event to be true.
- Logic OR
- When any of the RGB values are in range the event is true.
- Logic Custom
- Define your own logic using And/Or/Not and (). Each line is referred to as their index.
- With 3 entries all and'd it would be: 1 AND 2 and 3
- Use your preferred language as they are all acceptable and interchangeable.
- OR, |, || is treated as OR.
- AND, &, && is treated as AND.
- NOT, ! is treated as NOT.
- () are supported
- Advanced example with 5 events: ( 1 AND 2) OR !(3 | 4 || NOT 5)
- Validate button can verify script will execute at runtime.
- To create a Color/Point entry, click anywhere on the screenshot in the design view.
-
Design Image Search Events
- Image search looks for a predefined bitmap inside a search window.
- Image search always picks the closest matching location on the screenshot.
- A threshold value is calculated to determine how close the image matches from the screenshot.
- The threshold is relative similarities to the image being searched and the screenshot. There is no general rule for threasholds they need to be fine tuned to meet your requirements.
- On an Event node when [Event Mode] [Selection] is set to Object Search. Press the Create New Object With this Image [Button]
- A Create New Object Designer appears.
- Press Take a Screenshot to grab a new screenshot from the target window.
- Draw a box to identify the image that you would like to search with.
- Name the object wth a unique name.
- Press [Make Object]
- Simply add this object to the object list for use later.
- Press [Make Object + Use]
- Changes the original Event used to create the object to "Find {Name}"
- Sets the Search Object to the new object made.
- Creates a Click Event with "Click {Name}"
- Changes the original Event used to create the object to "Find {Name}"
- At runtime if Image Search Event is true, it centers the first child action and runs the child action at that location.
-
Design Actions can be Click, Move, Swipe or Keyboard
- Option to activate the window before an action is executed.
- Option to move the mouse from the system position before exeucting the action
- Click - Draw a box on the screenshot where the click should be. A random point inside the box will be clicked.
- Move - Draw a box from the start postion to the end position. Each start and end has a configurable box a random point inside each box will be chosen and the mouse will move.
- Swipe - Same as Move except the mouse is pressed.
- Keyboard - This is configured like a physical keyboard, you set which key and duration. You set the exact precision using quick buttons and millisecond timing.
-
Design Testing - All Events and actions have a test button you can use to interactively check your work.
- Event testing - A detailed visualizer shows the custom logic, reference and current window, and a visualization of the colors and locations. Re-Test button to pull new data.
- Object Search testing - A detailed visualization that shows the combined image along with R/G/B channels. Quick buttons to fine tune the threasholds and compare against the reference and current window.
- Click/Move/Swipe/Keyboard - These perform the action on the current window.
-
Design Execution Control - When running a screenshot is taken and all event nodes are checked to see if they match the screenshot.
-
Main loop delay is on the Project settings in the tree view under Project (Name) -> General-> Loop Delay (ms)
-
On each Event and Action the [After Completion] section runs after the Event or action is true.
- Continue - means to process the children then the next sibling.
- Back to Home - means to return to the top for a new iteration.
- Back to Parent - means to return to the parent node for processing.
- Stop Thread - means to stop the script.
- Recycle - This will stop the thread, attempt to close the application, and attempt to relaunch the application (Nox Only).
- GoTo (Selected Node) - Moves execution to the selected node. (useful for making shared functions)
-
On each Event and Action is a [Delay Additive] section.
- Controls the wait time after an action or event is finished. For example, after a click wait for 500ms for the screen to refresh.
-
Limits - are a way to control the repetitiveness of a Event or Action.
-
Limit types are iteration, time and session.
- Iteration limits set how often a event fires. If set to 5 for example, every 5th positive check will be executed.
- Time limits set how often an event fires with a timeout. If set to 5 minutes, after 5 minutes from the last postive check would be considered postive.
- Session limits - enable an action to be executed only once per session.
-
RNG - Random Number Generator
- Add 2 or more RNG nodes to split execution between the nodes. RNG is true RNG and not weighted.
-
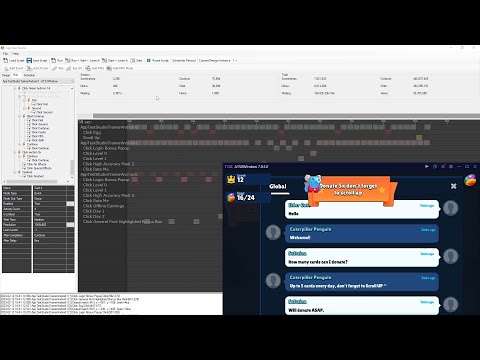
Run view provides visual and detailed information about running scripts.
- Main Display is an animated visualization tool that show the actions executed and the time allocated to the action in a easy to view track board.
- For every action an entry is added in the dynamic list and the size of the icons depends on the configuration. Actions proceed down the timeline to track accuracy. The timeline can be zoomed in from 25 seconds to 30 minutes.
- Right Table - is a detailed visualization of the actions taken with an execution pointer, and details about the number of actions taken.
- Clicking on a entry in the table brings up a visualizer that shows the events that were fired and the details on those events.
- A tree view is displayed that is read only, showing the running script information.
- Details include configuration information, Executions in the current session, ability to resize window to the target resolution and ability to turn off any node during runtime.
- Compare to all Runtime Images. Right clicking on an event node will provide the option to compare this node to each of the runtime images that were executed. This helps with script design and troubleshooting.
- Counters show Screenshots, Clicks, and a runtime timer.
- Thread counts show the currently running counter information.
- Session counts show counter information since the application started.
- Script counts show information about the number of actions per script.
- Total shows the counter information for all scripts.
- CPU - Shows the amount of time used in calculations. Scripts are run in individual threads and do not affect system performance, this is the calculation of the time allocated to perform the actions.
- Object search can be cpu intensive and you can use this to determine if fine tuning is needed to meet your performance goals.
- Clicks per second - This is an auto clicker, shows how many clicks were produced per second.
App Test Studio always runs scripts in their own thread, you can run multiple threads at once.
Install Visual Studio Community Edition
From Visual Studio Installer: Under Workloads install - .NET desktop development
From Visual Studio Installer: Individual components tab - .NET 9.0 Runtime (Long Term Support)
Youtube tutorials cover how to go from a beginner to an expert.
Click on the image to launch a youtube series.
Nox Player - Always launch the Emmulator from AppTestStudio AppTestStudio launches the emmulator with a specific WindowName, and resolution for consistency and automation.
1.) The Package Name is used to launch the application when the emmulator starts. If the Package Name is configured, pressing the "Start Emmulator + Launch App" button will launch the instance of nox player specified in the instance to launch (in 2. below). Package Name is recommended but not required, if you don't want or have the Package Name, Press the "Start Emmulator"( in 4. below) button instead. Then run the application from the emmulator manually. When scheduling a script to run at a later time, the application the Package name is required so that the script can be run, and the applicaion can be loaded.
2.) Instance to launch is the instance number you want to target during testing, launching and running scripts. This is required, users with a single instance will always choose instance 0. Multiple apps/accounts can be configured on different instances. For example, you could run 5 instances with the same account, and automate 5 different apps/games on each instance. Or you could run a different account on each instance, and run 5 separate instances of the same app/game.
3.) The Start Emmulator + Launch App button will run the Android Emmulator and launch the application on the emmulator.
4.) Start Emmulator button will launch the instance to launch(2) of the android emmulator with a set window name,and initial resolution for consistency.
Initial Resolution: is passed from the Start Emmulator buttons to set emmulator to a specific size so that the screenshots will always contain the same resolution. This helps with sharing the script. Be sure to have the "Fixed Window Size" checkbox checked, this will make it less likely to resize the window. Sometimes the emmulator window get's resized, it's best to restart the emmulator.
AppTestStudio will NOT function if the system goes to sleep, Screen Savers are OK, and Lock Screens are OK.
If running overnight makes sure the SCREEN and PC do not go to sleep by modifying the windows settings. If the Screen goes the sleep the GDI function return black screens. If the PC is sleeping well then nothing is running.

AppTestStudio can manage on multiple instances and run them in the background so there's no need to any fancy window management, however there are a few gotchas that are easily manageable.
1.) AppTestStudio can see what windows paints, Windows DOES NOT PAINT area's that are off the monitors view, Dragging the emmulators so that they are below the monitor's view will result in black areas where the emmulator is not shown. This also includes moving it partially on the Left, Bottom, or Right side. Running in the background (or forground is fine).
2.) Windows does not paint minimized applications so AppTestStudio can't see the windown. This makes windows efficent, but makes it invisible to AppTestStudio.
3.) Dual monitors is fine, however running them at different resolutions and moving the windows back and forth can cause instability when the DPI settings are different between monitors.
4.) Minimizing AppTestStudio is fine, AppTestStudio does not need to paint on the screen to function.
5.) Each thread runs independently on it's own, the events in the log show the exact time a event or action was completed. The logging system is setup to Queue so the log is a reflection of the past, but should not be used as an indication of timing. In most cases it won't be noticiable.
6.) Many apps paint a black or white or another color screen between activities. Be careful keying off those colors alone as they could produce false positives that are very difficult to track down. For example using color points of all black to trigger an event.
7.) AppTestStudio does not limit you from bombarding an application with events, keep in mind most applications cannot process 100's of click events per second. Depending on how the developers (or summer interns :) ) coded the application it may induce strange or corrupted behaviour.
8.) You can run muliple different or the same scripts simulateously in the background, just send them to a different instance.
9.) Avoid dragging a emmulator window at the same time clicks and drags are being sent, it won't hurt anything but it's annoying.
10.) Turn on: Require password for every purchase to prevent unexpected automated purchasing.
11.) Don't use with personal accounts.
12.) Sometimes its easier to edit the project file manually, often it's not.

13.) You can manually code in AppTestStudio XML and run them in AppTestStudio, See #12.
13.) Every time you save a backup project file is made, look in the backup folder.
14.) Try to build each action so that the script can be restarted in any spot in the process. (Avoid large chains of actions such as using continue after every action - sometimes it's necessary.
15.) Sometimes you need to sleep on it, getting stuck is no fun. Try and solve the problem from another angle.
16.) Some apps need button presses to be longer than instant. Change the default click speed from 0ms to 25ms or more.