The Archimedes Institute (Utrecht Science Park) had a request for an application that can analyse people's presentations. They want to be able to get statistics on the usage of gestures and your stance during a presentation. Based on this data they want to provide the user with feedback.
The idea we came up with was an application on a mobile device that uses video input from either the camera directly or gallery to estimate a single person's pose. Upon selecting your input a machine learning model (TensorFlow.js version of PoseNet) will be used to obtain joint coordinates (2 component vectors) for each source frame. The coordinates are stored in an Android Room database so the data is saved inbetween sessions and safe in case of app crash, restart, shutdown etc. The application performs an analysis on these coordinates to figure out what the person did during their presentation. The analysis is currently missing and has yet to be designed and implemented.
Android Studio (preferably latest version).
First make sure you have the latest version of Master branch. Open up Android Studio and select "Open an existing Android Studio Project". From here select the CHPE project, marked with the green Android Studio logo. To build select "Rebuild Project" under "Build" once the project has loaded up.
To run the application you'll need a debug device to run the application on. This can either be an Android Virtual Device or a physical smartphone. The project currently only supports Android 7.1+.
-
To use an Android Virtual Device you can read more about them here. If you're unhappy with the emulator performance try enabling Windows Hypervisor Platform.
-
To use a physical smartphone follow this guide.
A video consists of frames. These amount of frames shown every second (FPS) are variable. Each frame has 15 or 18 coordinates (depending on the model used). Consider the following Entity Relationship Diagram:
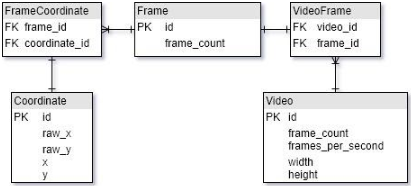
- For each video a record is added to the video table.
- For each frame of a video, a record is added to the frame table.
- For every coordinate a record will be added to the coordinate table.
- At last the relations between video, frame and frame coordinates are created.
Within the scope of Android and how the data is retrieved it is possible that the program is destructed while executing. This is not desired when the process is not finished yet and there has been no reason for the user to close the application.
This is taken into account by the database in the following way:
- If the application is stopped before the queries are executed, the entire process will restart.
- If a video is added, but there are no frames added, the existing data entries will be used to proceed.
- If a video is added and a frame is added, but there no coordinates known yet, the coordinates can be added and the process can continue.
- If a video is added and a frame is added, but not all coordinates have been added to the database yet, the frame will be re-processed.
it can take a really long time to process a certain video and you do not want to have to restart that progress if it gets interrupted.
Consider the following class diagram:
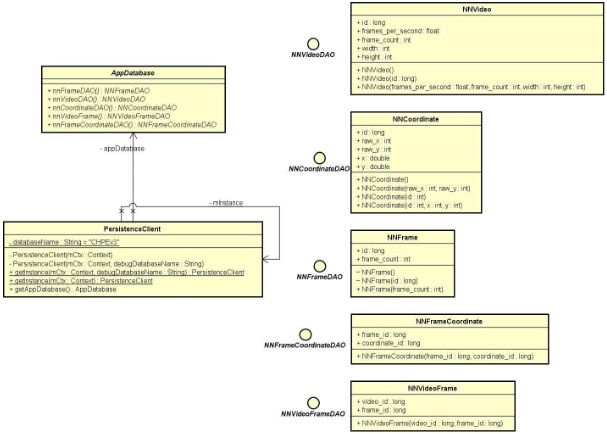
The persistance package is the implementation of our database, the database functions as ORM.
- AppDatabase Within this class the entities (classes / tables) are registered for Android Room. This class also provides access to the DAO's of each entity.
- PersistenceClient This class provides access to the AppDatabase instance and persists (hence the name) throughout the application's run time.
- The "NN" prefix is chosen to indicate that that files have something to do with the neural network. In addition to this, it is also an indication to the programmers that what happens with the NN-classes (not all of these are within the Persistance package) interacts with the database and should therefore not be interrupted.
- Android room is used, so the code you end up with (found in the generate folder with the suffix '_impl') can be different.
- Adjusting the scheme may result in having to upgrade the database version. Upgrading the database version also results in automatic script creation for switching between versions.
- The AppDatabase currently runs on the main thread of the CPU which, in Android, is usually reserved for the UI. It is recommended to execute tasks regarding the preparation of queries on a different thread to make sure the UI does not experience (more) delay.

The VideoHandler task is to process the video images. The VideoHandler need to be able to give data on a video and return frames from a specific fragment. In version 28 of android a handful of functions have been added within Android to process many of the VideoHandler functions with native api calls. For this reason a VideoSplicer legacy class was made as a manual implementation for older versions of android. The factory class can be used best to let the application decide if it needs the regular or legacy version.

- A session in short is the iteration of a video to data (points). The VideoSplicer is used to obtain a frame, process it and add it into the database.
- The NNInserts is responsible for sending the data to the database. Besides sending to the database the NNInsert is also responsible for normalizing the coordinates.
- The NNInterpreter is an enum that holds the type of interpreter used by the model. For example, it can either be run through the neural network API, CPU or GPU.
- CHPE (Camera Human Pose Estimation) is the class that takes a bitmap as input and returns this to data.
- The resolution class simply stores the data obtained from the splicer and can create scaled bitmaps.
To clarify the process consider the following activity diagram:


These custom exceptions were made to detect edge cases and make procedures for them. Within the system a couple of exceptions are possible that are so specific that a regular exception doesn't measure up. Below are some case where these exceptions may occur:
- InvalidFrameAccess This exception is thrown when the VideoSplicer has an older API and the loaded video has a variable framerate, this can lead to out-of-bounds frame access. The only way to retrieve the framerate on older API's is by manually counting them; this is extremely expensive because it is comparing every other frame with the frame before that one every millisecond. This trade-off is very small and we don't expect to retrieve variable frame rates very often. Depending on the situation we could say enough frames have been processed based on the complete duration of the video. If we are missing too many frames we could notify the user.
- InvalidModelParse A model that is not supported is was used, This can cause interpreter issues. For example, if the GPU or the neural network API is being used while it does not exist in the version of Android that is being used. For this exception we can use the CPU as a fallback.
- InvalidVideoSplicerType When the Android version used is too low, that even the legacy version of the VideoSplicer doesn't work as it is supposed to.
The UI was designed and created to be a stand alone front-end in which other developers can place "work" they want to be done at a certain point during runtime. We'll first take a look at what Android calls "Activities", how they are currently being used and how the next developer can add new ones. Consider this Homescreen example from the codebase:
public class a_Home extends AppCompatActivity {

	Button b_archive;
	Button b_start;

	@Override
	public void onBackPressed() {
		finishAffinity();
	}

	@Override
	protected void onCreate(Bundle savedInstanceState) {

		super.onCreate(savedInstanceState);

		setContentView(R.layout.layout_home);

		b_archive = findViewById(R.id.b_archive);
		b_start = findViewById(R.id.b_start);

		AAL.setTitleBar(getWindow());

		b_archive.setOnClickListener(new View.OnClickListener() {
			@Override
			public void onClick(View v) {
				launchIntent(a_Results.class);
				overridePendingTransition(R.anim.slide_in_left, R.anim.slide_out_right);
			}
		});

		b_start.setOnClickListener(new View.OnClickListener() {
			@Override
			public void onClick(View v) {
				launchIntent(a_VideoSelect.class);
			}
		});
	}

	public void launchIntent(Class<?> cls) {
		Intent intent = new Intent(this, cls);
		startActivity(intent);
	}
}
In java it's customary (and sometimes a requirement) to limit the contents of a file to a single class. In the UI folder of the project you can find every file for every activity of the current application. To add a new activity simply create a new file and make a new class that extends from AppCompatActivity. this extension should always override the onCreate() function, this is basically the constructor. In here you can request the layout and talk to individual screen elements.
The most basic way of retrieving individual screen elements is by calling findViewById(R.id.X) where the "X" should be replaced with the corresponding ID you defined in the XML layout file of that activity. The functions returns a Java handle to the screen object. Take a look at the example above to see how a button is retrieved and how you define what should happen on click.
For providing feedback to the user (not necessarily required to use) we have created a recyclerView which is basically a list that can hold any amount of Android cards. These cards can be designed using the XML editor. For now we have provided a single card layout that can be used to show the user an overview of all the presentation feedback remarks.
The same card layout can be duplicated and altered to make a list of sessions in the archive section of the application. Our design for the archive can be found here.
Take a look at the files prefixed with "c_" in the UI folder for more information and the implementation.
For this project we have developed a simulation for the data substracted from video files. This Simulation can be used to visualize the 2D data. The animation runs from the database data that you can give your animation as a parameter. The code can be found in the 3D simulation branch CPHE/android/src/com/mygdx/game/Simulation. "MyGdxGame.java" is the main for this simulation and can be run from a separate view. In the 3D simulation branch MyGdxGame.java runs on example data. The data can be provided to the animation in the following way by adjusting these lines in MyGdxGame.java:
data = new DatabaseData(PersistenceClient.getInstance(context).getAppDatabase());
body.create(1f, data);
If you ever wonder if your data is correct, or if your application is not behaving as it should. Try to use the visualisation feature to make sure the data looks as it should. Why is this usefull? Eventhough the JASON format is easy to read. It might come in helpfull to be able to actually visualize your data. Your could also use this feuture purely as aestethics.
Android is all about “Intent”. Intents hold the information about your current session and the context that surrounds your current activity. You will be using an “Intent” to start a new activity (a new screen inside your application). The way to create a new Intent is very simple;
	Intent intent = new Intent(this, cls);
        startActivity(intent);
The way you'll want to start up Intent could be different in every situation, the user might want to enter your application on a specific screen because he/she pressed a "notification", or the user expect to travers through the application with the use of buttons and or swiping. To implement these different methods you'll need to bind the creation of the "Intent" to different function, like the use of an on-screen button.
        b_start.setOnClickListener(new View.OnClickListener() {
            @Override
            public void onClick(View v) {
                launchIntent(a_VideoSelect.class);
            }
        });
In this case the "b_start" is the button that is on the screen, the "setOnClickListener()" method calls for the function "launchIntent()", making the user go to a new "Activity"/screen.
    public void launchIntent(Class<?> cls) {
        Intent intent = new Intent(this, cls);
        startActivity(intent);
    }
In some situations you'll want to pass along data/information to the next "Activity", one way to do that is to add some content to the "Intent" you are creating. For a full list of what data that can be added to an "Intent" see the Android developer documentation. The code bellow should give a short impression of what is possible.
        intent.setType("video/*");
        intent.setAction(Intent.ACTION_GET_CONTENT);
        intent.setFlags(Intent.FLAG_GRANT_READ_URI_PERMISSION);
        intent.addFlags(Intent.FLAG_GRANT_WRITE_URI_PERMISSION);
        intent.putExtra("return-data", true);
When you create a new "Activity", through the menu or adding a Java class, you must always declare this "Activity" in the "Android Manifest". This is a special XML file that contains general information about your application.
<?xml version="1.0" encoding="utf-8"?>
<manifest xmlns:android="http://schemas.android.com/apk/res/android"
    xmlns:tools="http://schemas.android.com/tools"
    package="com.mygdx.game">

    <uses-permission android:name="android.permission.READ_EXTERNAL_STORAGE" />
    <uses-permission android:name="android.permission.WRITE_EXTERNAL_STORAGE" />
    <uses-permission android:name="android.permission.INTERNET" />
    <uses-permission android:name="android.permission.FOREGROUND_SERVICE" />
    <uses-permission android:name="android.permission.VIBRATE"/>
    <uses-permission android:name="android.permission.CAMERA" />
    <uses-permission android:name="android.permission.WAKE_LOCK" />


    <application
        android:allowBackup="false"
        android:alwaysRetainTaskState="true"
        android:appCategory="game"
        android:icon="@drawable/ic_launcher_foreground"
        android:isGame="false"
        android:label="Prepper"
        android:screenOrientation="portrait"
        android:theme="@style/Theme.AppCompat.NoActionBar"
        tools:ignore="GoogleAppIndexingWarning">
        <activity android:name=".UI.a_Results"></activity>
        <activity android:name=".UI.a_Archive" />
        <activity android:name=".UI.a_VideoSelect" />

        <uses-library
            android:name="android.test.base"
            android:required="false" />
        <uses-library
            android:name="android.test.mock"
            android:required="false" />

        <activity android:name=".ProcessingScreenActivity" />
        <activity android:name=".CurrentResultActivity" />
        <activity android:name=".PreviousResultActivity" />
        <activity android:name=".GalleryScreen" />
        <activity
            android:name=".UI.a_Loading"
            android:launchMode="singleTask" />
        <activity
            android:name=".UI.a_Home"
            android:screenOrientation="portrait"
            android:theme="@style/Theme.AppCompat.NoActionBar">
            <intent-filter>
                <action android:name="android.intent.action.MAIN" />

                <category android:name="android.intent.category.LAUNCHER" />
            </intent-filter>
        </activity>

        <service
            android:name=".ForegroundService"
            android:enabled="true"
            android:exported="true"
            android:grantUriPermissions="true"
            android:permission="android.permission.BIND_JOB_SERVICE" />
        <service
            android:name=".NeuralService"
            android:permission="android.permission.BIND_JOB_SERVICE" />
    </application>

</manifest>
As you can see not just "Activities" are declared here. For more information about specific problems there is the Android developer website, it holds all the information one needs to create an Android application.
When you have created a new "Activity" for your application you'll want to create an intuitive UI for the user. Google has certain guidelines in place for application design. This design philosophy is called Material Design. By using these guidelines Google tries to offer users of Android applications an overal familiar experience on the Android platform.
You start by choosing the correct layout, there are several layouts to choose from and depending on the purpose of the current "Activity" you will want to choose the most appropriate layout. Usually the more modern "Constraint Layout" will suit your design needs and goals.
<androidx.constraintlayout.widget.ConstraintLayout xmlns:android="http://schemas.android.com/apk/res/android"
    xmlns:app="http://schemas.android.com/apk/res-auto"
    xmlns:tools="http://schemas.android.com/tools"
    android:id="@+id/my_layout"
    android:background="#00A1E1"
    android:layout_width="match_parent"
    android:layout_height="match_parent"
The upper portion of the XML file corresponding to your "Activity" will have general information about what kind of layout it is, and perhaps the color or link to a texture file in your resource folder. The layout height and width correspond (in this case) to the size of your screen. Nested layout will correspond to the parent layout, giving the developer the ability to use several layouts within eachother if ever needed.
Next you will need "Views" in order to seperate (or not) the screen in blocks, so that UI elements can be placed inside different or single views. This will help to keep UI elements grouped toghether and ease the design process.
    <View
        android:id="@+id/game"
        android:layout_width="wrap_content"
        android:layout_height="wrap_content"
        app:layout_constraintBottom_toBottomOf="parent"
        app:layout_constraintEnd_toEndOf="parent"
        app:layout_constraintStart_toStartOf="parent"
        app:layout_constraintTop_toTopOf="parent" />
In the code above the developer chose to keep a single view within his layout, setting the constraints to the views parent --> the ContstraintLayout. Setting an id for any UI element makes it accessible from the Java code, giving the developer the possibility to interact with UI elements.
Next up is the implementation of a single button. Buttons give the user a clear and simple way to interact with your application.
    <Button
        android:id="@+id/JUMP"
        android:layout_width="match_parent"
        android:layout_height="wrap_content"
        android:layout_marginLeft="15dp"
        android:layout_marginRight="15dp"
        android:layout_marginBottom="15dp"
        android:textAllCaps="false"
        android:text="Naar Resulaten"
        android:background="@drawable/custom_button"
        android:textColor="@android:color/white"
        app:layout_constraintBottom_toTopOf="@+id/previousResults"
        app:layout_constraintEnd_toEndOf="parent"
        app:layout_constraintHorizontal_bias="1.0"
        app:layout_constraintStart_toStartOf="parent" />
Note that not all the design of a button happens in this XML file, the developer has the freedom to create a template button XML file that could be use all over the application.
<shape xmlns:android="http://schemas.android.com/apk/res/android" android:shape="rectangle">
    <solid android:color="#E63028"></solid>
    <corners android:radius="25dp"></corners>
    <stroke android:color="@android:color/white"
        android:width="2dp"></stroke>
</shape>
Within the resource folder is a "drawable" folder where you have the freedom to create custom buttons with custom textures and shapes, to be used wherever you see fit. Keep in mind that UI elements such as buttons have clear "Material Design" rules, if you plan to follow this design pattern.
Google has the goal to keep applications performing as good as possible, so that the user has a smooth experience. This means that the "main thread (or "UI thread") can focus as much as possible on drawing UI elements on the screen without dropping any frames. Meaning that if your phone has a 60hz display, it needs 1000ms/60hz = 16ms per frame to draw everything. In practice it comes down to even less milliseconds since the processor core needs to perform a few key tasks before it can start to redraw a frame. This all means that if possible, you should keep your workload on a different thread than the "main thread". For that you could use threading. Making a new thread in Android is fairly simple, knowing where to use a new thread effectively might be more challenging. The more you can keep of the "Main thread" the better.
public void onClick(View v) {
    new Thread(new Runnable() {
        public void run() {
            // a potentially time consuming task
            final Bitmap bitmap =
                    processBitMap("image.png");
            imageView.post(new Runnable() {
                public void run() {
                    imageView.setImageBitmap(bitmap);
                }
            });
        }
    }).start();
}
The above code shows how to start a new thread with corresponding work. If data needs to be collected while the thread is still running, you will need to create a handler to fetch data between threads.
Handler handler = new Handler();
handler.post(new Runnable() {
                        @Override
                        public void run() {
                            String txt = progress / 100 + "%";
                            progressText.setText(txt);
                        }
                    });
A handler could be used to fetch data from ongoing processes to be shown on-screen.