Bomberman is a robot engaged in the production of bombs. Like his fellow robots, he had been put to work in an underground compound by evil forces. Bomberman found it to be an unbearably dreary existence. One day, he heard an encouraging rumor. According to the rumor, any robot that could escape the underground compound and make it to the surface could become human. Bomberman leaped at the opportunity, but escape proved to be no small task. Alerted to Bomberman's betrayal, large numbers of the enemy set out in pursuit. Bomberman can rely on bombs of his own production for his defense. Will he ever make it up to the surface? Once there, will he really become human?
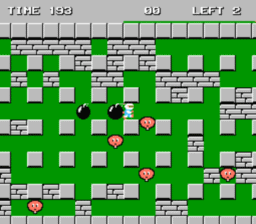
Bomberman's goal is to reach the surface of the earth. However, his initial point of departure is deep in the bowel of the earth, so Bomberman must search for exitways and make his way upwards, level by level. Of course, enemy forces are lurking throughout the labyrinth, and Bomberman must overcome each and everyone in order to advance to the next level. If he should touch any of the enemy or be caught in the flames of exploding bombs, he's out for the count, so extreme caution is urged. The exitways are always concealed among the brick walls and can only be found by dissolving bricks by the flames of exploding bombs, also concealed in brick walls are "power-up" panels, which Bomberman collects in order to increase his powers.
-
BOMBS In the earliest stage of the game, only one bomb can be set at a time and it has very weak firepower. As "power-up" panels are taken in, the bombs become easier to use and more lethal.
-
BRICKS These dissolve when hit by the flames of exploding bombs. Hidden within the bricks are exitways and "power-up" panels, so it is wise to bomb out as many bricks as possible.
-
CONCRETE Concrete walls aren't damaged by bomb fires, so Bomberman can take shelter from exploding bombs.
-
EXITWAYS These are to be found among the bricks. After overcoming all enemies, Bomberman stands over the exitways to proceed to the next level. However, Bomberman is in real trouble if an exitway is hit by a bomb. If this happens, any existing enemies on the map are removed, and in their place 8 enemies of one difficulty higher than the hardest enemy in the level will spawn. For example, if a level has 3 Ballooms and 3 ONeals, 8 Dolls would spawn in this case. The same thing happens also in the case that an powerup is exploded by a bomb.
-
"POWER-UP" PANELS These panels turn up occasionally among the bricks. There are several different types of panels with different effects, For example, in the illustration below, a panel is shown that has a picture of a bomb. When this panel is picked up, the number of bombs can be set at one time. The pictures seen on the panels show their various effects. There are levels that can not be cleared if Bomberman does not collect a large number of "power-up" panels, so panels should be picked up whenever they are found.
-
ENEMY CHARACTERS There are 8 types of enemy characters. Each type moves in its own particular fashion, so it's wise to learn their moves. If all enemies on a single level can be knocked out by 7 bombs, a player's scores will increase greatly.
- Balloom 100 pts.
- O'neal 200 pts.
- Doll 400 pts.
- Minvo 800 pts.
- Kondoria 1000 pts.
- Ovapi 2000 pts.
- Pass 4000 pts.
- Pontan 8000 pts.
See the table on this page for a list of which enemies (and how many of each) appear in each stage: http://strategywiki.org/wiki/Bomberman/Walkthrough.
-
BONUS LEVELS A bonus level is awarded after the consecutive five levels are cleared. The objective on bonus level is to take out as many enemies as possible within a limited time. On these levels, Bomberman can't be hurt by exploding bombs, so dump the explosives as much as you can.
- The user gets points for killing enemies (see points distribution above)
- If you kill two enemies with the same bomb, the you get double points for the second kill.
- The lowest value kill gets doubled. eg. killing a Ballom and a Doll results in the Baloom being worth 200 pts and the Doll being worth the usual 400
- Killing more than two enemies on a single bomb results in doubling the double for each successive kill. eg. killing 4 balooms with one bomb results in a total score of 100 + 200 + 400 + 800 = 1500 pts
There are two different categories of powerups in Bombemran. Some are lost as soon as Bomberman dies while the others are kept even if Bomberman dies. When you restart a new game from an unlocked level, you only start with the powerups which are kept on death.
- Bombs - increases the amount of bombs dropped at a time by 1, up to a maximum of 10.
- Flames - increases explosion range of all bombs by 1 square in each direction.
- Speed - increases movement speed.
- Detonators - Gives the abilitiy to detonate the oldest bomb.
- Bomb Pass - Gives the ability to pass through bombs.
- Wall Pass - Gives the ability to pass through destructible walls.
- Flame Pass - Gives immunity to explosions.
- A map is 31 tiles across and 13 tiles down. Note that this includes the surrounding wall. The actual playable section is 29 tiles across and 11 tiles down.
- At any given time, there are 15 columns and 13 rows which are visible. You may get into a scenario where only half of the leftmost tile and half of the rightmost tile are visible in which case there are actually 16 tiles wide visible on screen, however the maximum number of whole tiles is 15 across.
- The screen will scroll when Bomberman is in the center, ie. 7 tiles on both side of Bomberman. Scrolling stops if Bomberman is within 7 tiles of the leftmost or rightmost edge of the map.
- Each level one powerup will be randomly placed behind a brick, with a uniform random distribution
- Each level one exit portal will be randomly placed behind a brick that is unoccupied, with a uniform random distribution
- Bomberman always begins at the topleft corner of the map.
- The topleft corner of the map is always cleared of bricks and enemies
- Ememies are generated randomly accross the map where where there is neither a block nor a brick, with a uniform random distribution
- Slow will move the slowest
- normal enemies will move twice as fast as slow enemies
- fast enemies will move three times as fast as slow enemies
- Low intelligence enemies will move in one direction until they hit an obstacle then they will move in the opposite direction
- medium intelligence enemies will move like low intelligence enemies but may change directions at an intersection with a 10% chance. Medium intelligence enemies shall also chase bomberman if bomberman comes within a 1 square radius.
- High intelligence enemies move like medium intelligence enemies with a 50% chance of changing directions. High intelligence enemies shall chase bomberman if he is within a 2 square radius; if there is an obstacle between bomberman and the enemy, it will use A star search to find the path to bomberman, if such a path exists. The enemy will check for bomberman and recalculate the path everytime it traverses 1 grid cell.